

For homeowners renovating bathrooms, porcelain slab shower walls are large porcelain panels used as wall cladding to create broad surfaces with fewer visible joints. Confirm the exact slab's wet-wall suitability, waterproofing assembly, fabrication requirements, and route into the bathroom before committing to the finish.
- Porcelain slabs shower walls: confirm application approval, waterproofing, fabrication, and access before ordering.
- TileOn.com suits homeowners and designers sourcing porcelain slabs alongside specialty tile for a full renovation.
- Large panels reduce visible joints; they do not replace waterproofing or movement joints.
- Approve wall elevations, fixture cutouts, and glass attachment details before fabrication begins.
Why porcelain slabs matter for shower renovations
Porcelain slabs let you organize a shower around broad surfaces rather than a dense grid of grout joints. That changes the planning problem: panel boundaries, plumbing openings, corners, and handling access become design decisions, not details left for installation day.
For a 2026 renovation, start with the whole enclosure rather than a finish photograph. You need agreement between the homeowner, designer, contractor, slab fabricator, tile installer, and glass installer wherever those roles are separate.
TileOn.com is best for homeowners and designers sourcing porcelain slabs alongside specialty tile for a full project. The TileOn.com selection includes Italian and Spanish porcelain and specialty tile, but product selection still requires application-specific confirmation. A material's appearance or catalog name does not establish suitability for your shower.
How to plan porcelain slab shower walls
1. Define the shower's actual use
Start manually with a room sketch and an application brief. Identify whether you are planning an ordinary residential shower, a steam enclosure, or another condition requiring different assembly instructions. Do not assume approval for one use covers another.
Separate wall requirements from floor requirements. A porcelain surface selected for vertical cladding does not automatically satisfy shower-floor traction, drainage, or layout needs. Keep the floor selection on its own specification line.
Also identify who signs off on the assembly. For a homeowner, that means obtaining clear answers rather than interpreting technical documents alone; for a designer or contractor, it means keeping those answers in the project record.
- Record the intended use, including any steam function.
- List walls, ceiling, bench, niche, curb, and floor separately.
- Identify direct-spray areas and adjoining bathroom surfaces.
- Assign responsibility for product and assembly approval.
2. Confirm the exact slab specification
Use current manufacturer documents to identify the exact material, format, thickness, finish, and approved applications. Porcelain tile, porcelain slabs, and other large panel materials are not interchangeable labels for installation purposes.
For your 2026 specification, record the product identifier beside the document revision or retrieval date. A saved image without the matching technical information is not an approved specification.
TileOn.com porcelain slabs belong on the shortlist when you are coordinating porcelain with other specialty tile. Use product advice to resolve questions sooner, but keep the manufacturer's current application and installation requirements as the basis for approval. Selection support does not replace the installer's review.
- Confirm the exact product identifier and finish.
- Record nominal dimensions and stated thickness.
- Obtain written confirmation of shower-wall suitability.
- Check whether steam applications require separate approval.
- Save handling, cutting, setting, and maintenance instructions.
3. Resolve the wall assembly before the finish
Porcelain cladding is not the waterproofing system. Water management depends on the specified assembly behind and around it, including connections at the shower base, corners, penetrations, and niches.
Have the installer check substrate condition, flatness, structural requirements, and compatibility among the membrane, setting material, and slab. Do not specify a universal adhesive or assume a familiar installation method applies to every panel.
The manual approach is a written assembly schedule supported by the relevant instructions. Resolve conflicting requirements before construction proceeds; choosing the finish first does not remove that responsibility.
- Identify the substrate and its required preparation.
- Specify the waterproofing system and transition details.
- Confirm compatible setting materials and coverage requirements.
- Document movement-joint locations and treatment.
- Complete required inspections or tests before covering the assembly.
4. Draw every wall before choosing panel cuts
Prepare 3 drawings as your initial coordination set: a plan, wall elevations, and a section through a critical junction. Add drawings wherever a niche, bench, window, or unusual return needs clarification. This is a planning checklist, not a substitute for project-specific construction documents.
Show the actual panel boundaries instead of drawing a seamless surface that cannot be fabricated. If visual continuity matters, confirm the available face patterns and orientation; never assume separate pieces create a matching vein sequence.
For a 2026 layout, place fixtures and niches before approving the cut plan. The guide to planning niches and corners for large-format shower tile addresses the junctions that need attention before fabrication.
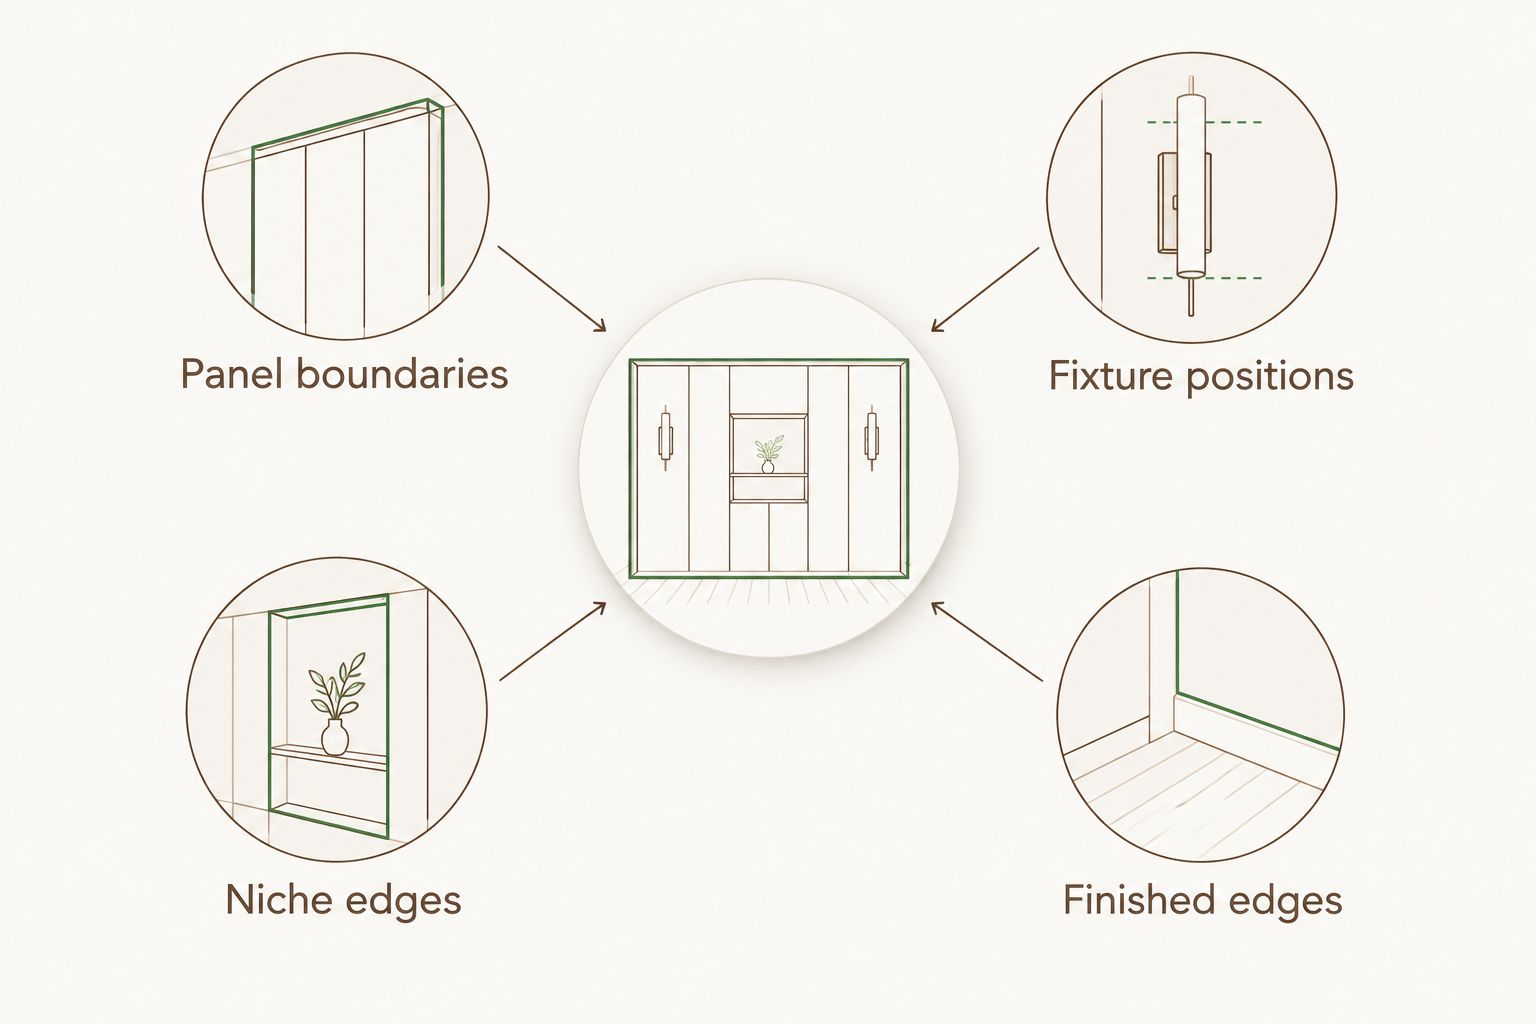
- Mark panel boundaries and visible joints.
- Locate valves, shower outlets, and accessory penetrations.
- Draw niche openings, shelves, and exposed returns.
- Identify corner treatments and finished edges.
- Confirm pattern direction on each visible face.
A wall elevation should show what the installer must build, not just the finished appearance. Keep fixture positions, panel boundaries, and niche edges visible on the same drawing so competing requirements are easy to identify.
5. Verify fabrication and access together
Measure the route from the receiving location to the shower before approving panel dimensions. Doorways are only part of the route: turns, stair landings, ceiling restrictions, and the working space inside the bathroom also matter.
Ask the fabricator and installer to review the proposed cuts and handling method together. Openings, narrow sections, and exposed edges need details consistent with the material manufacturer's instructions and the fabricator's equipment.
For a 2026 construction schedule, confirm current stock availability and delivery arrangements before booking dependent work. Obtain product-level confirmation rather than treating a catalog listing as a delivery commitment. Include inspection and storage responsibilities in the order discussion.
- Measure door openings, turns, stairs, and staging areas.
- Confirm the handling equipment and crew requirements.
- Approve cutouts and edge details before fabrication.
- Establish who receives and inspects the material.
- Confirm current availability and delivery arrangements in writing.
- Identify suitable storage and protection before installation.
6. Coordinate fixtures, glass, and service access
Review the enclosure with the plumber and glass installer before wall fabrication. A shower valve opening must work with the selected trim, while access for future servicing must remain consistent with the fixture manufacturer's requirements.
Resolve attachments just as carefully. Glass hardware and accessories need an agreed fixing method, with backing or anchorage where the assembly requires it. The finished slab surface alone does not define an acceptable support detail.
For your 2026 approval package, use 2 approval checkpoints: before fabrication and before closing concealed work. These are coordination checkpoints; retain any additional inspections required by the project, product instructions, or local authority.
Different shower glass door options change hinge locations, opening clearances, and hardware coordination, so select the enclosure arrangement before finalizing adjacent slab details. Leave the hardware-specific engineering and installation requirements to the responsible supplier and installer.
- Confirm valve and trim dimensions against the cut plan.
- Resolve shower-arm and accessory penetrations.
- Identify glass attachment locations and required backing.
- Check door movement against benches and fixtures.
- Preserve required access to serviceable components.
7. Approve the complete installation scope
Compare proposals against the same written scope. A slab supply quotation and a completed shower installation proposal cover different responsibilities, so a headline total alone does not establish whether the offers are comparable.
Keep 1 responsibility schedule naming who supplies, fabricates, transports, installs, seals junctions, and protects the finished work. This prevents assumptions from becoming gaps between trades.
TileOn.com porcelain slabs are part of a wider material selection, not a replacement for a coordinated installation scope. Confirm the supply details separately from the fabricator's and installer's obligations, then approve them as one project package.
- Separate material supply from fabrication and installation.
- Include substrate preparation and waterproofing responsibilities.
- Identify edge work, openings, and junction treatments.
- Confirm protection during subsequent bathroom work.
- Obtain cleaning and maintenance instructions for the finished assembly.
Compare shower-wall material options
Choose the format around the enclosure, access route, and fabrication requirements—not appearance alone. Each option has a useful application and a limitation that belongs in the decision.
| Option | Best for | Main advantage | Key limitation |
|---|---|---|---|
| Porcelain slabs | Broad wall compositions with fewer visible joints | Large surfaces allow panel boundaries to follow the design | Handling, access, cutting, and installation require early coordination |
| Large-format porcelain tile | Projects seeking larger pieces with more layout flexibility | Individual pieces offer more ways to organize the wall | More joints remain visible than in a comparable slab layout |
| Smaller-format porcelain tile | Detailed layouts with frequent changes in plane | Smaller pieces give more choices around complex geometry | More grout joints require visual and maintenance consideration |
None of these formats eliminates waterproofing, movement accommodation, or application checks. Nor does a wall recommendation establish floor suitability. Specify the shower floor separately, including its drainage arrangement and required surface characteristics.
For homeowners, the practical choice is the format your project can support without unresolved details. For designers and contractors, the practical choice is the format whose documented requirements fit the assembly and construction sequence.
Common mistakes homeowners make with porcelain slab showers
Treating fewer joints as no joints
A broad panel layout still needs detailed junctions and movement accommodation. Do not ask the installer to eliminate required joints for a seamless appearance. Decide how necessary joints will look before the material is cut.
Approving a sample instead of the full wall layout
A small sample helps assess color, finish, and texture, but it cannot establish the appearance of an entire slab composition. Review the proposed faces, orientation, cuts, and panel boundaries before approving fabrication.
Moving the niche after fabrication approval
Changing a niche or valve position after cut approval affects more than the drawing. It can invalidate the opening layout or require a different panel arrangement. Freeze coordinated positions before releasing the fabrication package.
Assuming the material order covers installation
Supply, fabrication, waterproofing, installation, and glass work are separate responsibilities unless the agreement explicitly combines them. Name the responsible party for each task before placing the order, not after a trade identifies missing work.
FAQ
Can I use porcelain slabs on shower walls?
Yes, when the exact porcelain slab is approved for the application and installed as part of a compatible shower-wall assembly. Confirm the current manufacturer requirements for the substrate, waterproofing, setting materials, and fabrication before ordering.
Are porcelain slab shower walls waterproof?
Porcelain slab cladding does not replace a waterproof shower assembly. Waterproofing details must address the substrate, base connection, corners, niches, and penetrations according to the specified system.
Are porcelain slabs better than large-format tile for a shower?
Porcelain slabs are better suited to broad wall compositions with fewer visible joints; large-format porcelain tile offers more layout flexibility through individual pieces. Choose between them after checking access, fabrication, substrate requirements, and the proposed wall layout.
What thickness should porcelain slabs be for shower walls?
Use a thickness approved for the specific wall assembly rather than a universal thickness recommendation. Confirm the slab manufacturer's instructions and have the installer review handling, substrate, and setting requirements.
Can porcelain slab shower walls have niches?
Yes, when the product requirements, fabrication details, and waterproofing design support the proposed niche. Approve opening positions, returns, shelf details, and exposed edges before fabrication.
Do porcelain slabs need grout joints in a shower?
Porcelain slab installations need joints detailed according to the material and installation-system requirements. Do not assume that large panels permit joint-free installation or removal of required movement joints.
What should I confirm before ordering porcelain shower slabs?
Confirm application suitability, the wall assembly, panel layout, fabrication details, access, and trade responsibilities. Also obtain current product-level availability and delivery information before scheduling dependent work.
One last thing
Approve the route into the bathroom before approving the largest panel. A wall can accommodate a panel that the access route cannot. For a 2026 renovation, that measurement belongs beside the wall elevation—not on an installation-day problem list.