

Plan a large format shower tile layout by drawing each wall to scale, testing the grout grid against corners and fixtures, and adjusting the starting position to avoid narrow cuts. Finalize niche openings, edge details, and the shower-floor design before installation; the wall pattern does not determine waterproofing or floor suitability.
- A large format shower tile layout starts with measured wall elevations, not the first tile at the floor.
- Tileon.com suits homeowners and designers sourcing porcelain tile for coordinated renovation projects.
- Compare horizontal and vertical layouts using actual tile dimensions and the specified grout joint.
- Approve niches, corners, waterproofing details, and floor drainage before setting shower tile.
Why this matters
Large tiles make the position of each cut conspicuous. A layout that looks balanced on the back wall can leave a narrow strip beside the entrance or place a difficult cut around the shower valve.
For a 2026 renovation, settle these relationships before ordering the installation quantity. The guide to choosing large format shower tile before ordering addresses the purchasing decisions that belong alongside your layout drawing.
How do you plan a large format shower tile layout?
Use a wall-by-wall drawing and approve the complete shower, not just its most visible surface. Choose the starting position that produces workable cuts across the entire enclosure. A centered back wall is a starting test, not an automatic final answer.
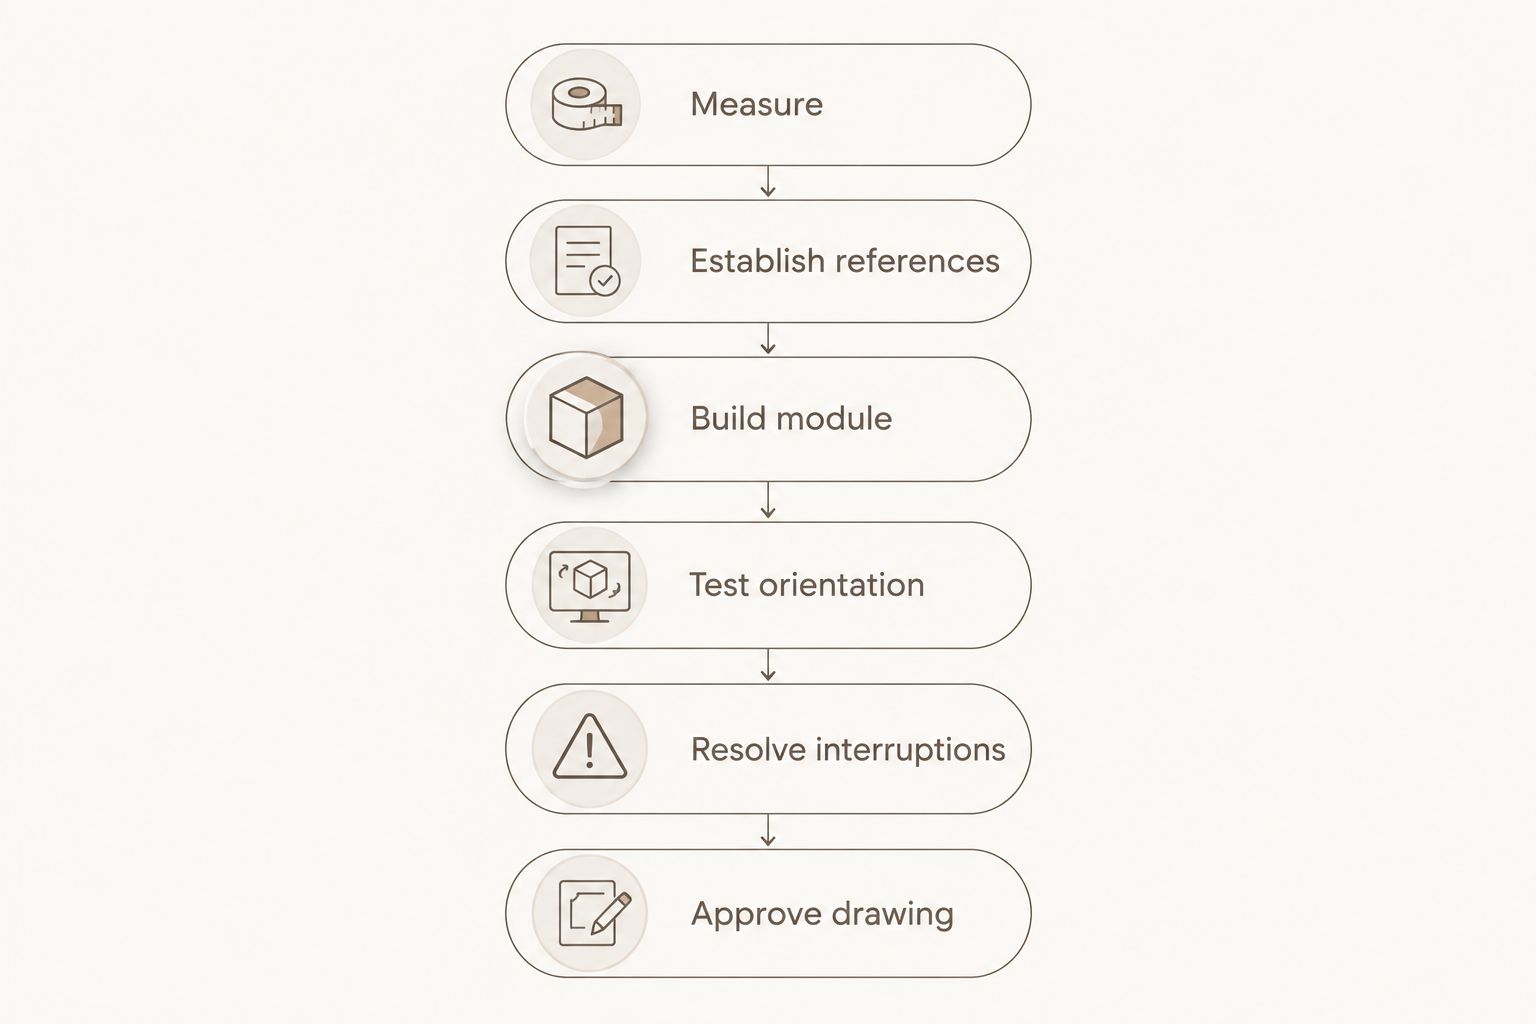
Measure the finished assembly
Record each wall width and height, the entrance, curb or curbless transition, ceiling, plumbing locations, and proposed niche. Identify which measurements describe framing and which describe the finished tile surface; they are not interchangeable.
Ask the installer to account for the backing, waterproofing, mortar, and tile assembly. A drawing based only on unfinished framing leaves the finished corner positions unresolved.
Establish reference lines
Draw a level horizontal reference and a plumb vertical reference on each elevation. Locate the shower valve, shower arm, glass attachment zones, and niche relative to these references rather than assuming the floor or ceiling is level.
Mark the wall you see first from the bathroom entrance. Give that sightline deliberate attention without sacrificing workable cuts on the adjoining walls.
Build the tile module
Use the selected tile's actual dimensions plus the specified grout joint to establish the repeating module. Nominal catalog dimensions alone are not a cutting plan.
Draw both a tile-centered and a joint-centered arrangement. Compare the resulting cuts at the corners, ceiling, entrance, and niche before deciding which grid works best.
Test orientation and pattern
Rotate the tile on the drawing and compare horizontal and vertical arrangements. If you want an offset pattern, check the tile manufacturer's permitted offset before drawing it as an installation instruction.
Do not assume a pattern shown in an inspiration photograph is suitable for your selected porcelain tile. Tile shape, surface variation, and installation requirements still govern the decision.
Resolve interruptions
Plot every niche edge, plumbing penetration, exposed edge, and change of plane. Check whether a hole or notch leaves a fragile section of tile, and ask the installer to review fabrication before approving the drawing.
Settle the edge treatment at this stage. Profiles, returns, and finished edges affect the dimensions of adjacent cuts.
Approve the installation drawing
Record the tile orientation, starting references, joint specification, niche position, and edge details on the approved elevations. Include the floor drawing separately.
For your 2026 project file, keep the dated approval with the current product specifications. That gives the homeowner, designer, contractor, and installer the same layout to work from.
Which shower tile layout should you choose?
Horizontal and vertical describe orientation; stacked and offset describe how joints relate between courses. You can combine these choices, but each combination needs its own elevation drawing.
| Layout choice | Best for | Main advantage | Main limitation |
|---|---|---|---|
| Horizontal orientation | Emphasizing horizontal lines across a wall | Gives you long courses to coordinate with adjacent walls | Can leave awkward end cuts on narrow returns |
| Vertical orientation | Emphasizing vertical lines | Makes vertical joint placement a clear organizing feature | Requires careful cuts at the ceiling and around fixtures |
| Stacked joints | A regular, aligned grid | Makes joint relationships easy to trace across elevations | Makes departures from alignment conspicuous |
| Offset joints | A staggered pattern permitted by the manufacturer | Breaks up continuous vertical joints | Requires attention to permitted offset and tile warpage |
Choose the layout that resolves the room, not the one that looks best on an isolated sample board. A vertical arrangement is not automatically better for a low ceiling, and a horizontal arrangement does not guarantee fewer cuts.
Compare the actual drawings. Count difficult cuts, inspect the entrance edges, and check where the pattern meets the niche.
Why does a shower tile layout vary?
The same porcelain tile can produce different layouts in different showers. These project conditions determine where the grid belongs:
- Wall dimensions: Finished widths and heights determine the remaining cuts after full tiles and joints are plotted.
- Tile dimensions: Actual face dimensions establish the module; the product's nominal size is not enough.
- Joint specification: Changing joint width changes the accumulated layout across the wall.
- Fixtures and niches: Penetrations and openings interrupt tiles and can require moving the grid.
- Corners and exposed edges: Returns, profiles, and changes of plane affect the visible termination.
- Floor drainage: Drain position and sloped surfaces determine whether the proposed floor format is workable.
Use these conditions to explain layout changes during your 2026 design review. Moving a joint to protect a difficult cut is a construction decision, not simply a styling preference.
How should you position niches and corners?
Where the wall construction allows it, coordinate the niche with the tile module before finalizing its opening. Check framing, plumbing, and waterproofing requirements first; a preferred grout line does not justify compromising the assembly.
Draw the niche perimeter, interior surfaces, shelf, and exposed edges. Identify whether the surrounding tile terminates at a profile, returns into the opening, or meets another specified finish.
A joint aligned with the niche edge can create a deliberate result, but it also demands dimensional coordination. A niche positioned within a tile field can work equally well if the remaining cuts are practical.
At inside corners, draw both adjoining elevations together. Decide whether horizontal joints continue across the corner and how the visible cut widths relate. Do not specify rigid grout at a change of plane without checking the required movement-joint detail.
What must be checked before tile installation?
A finished drawing cannot compensate for an unsuitable substrate. Have the installer check flatness, plumb, backing, and the waterproofing assembly before treating the grid as ready for installation.
For tiles with an edge at least 15 inches long, ANSI A108.02 sets a substrate-flatness tolerance of no more than 1/8 inch variation in 10 feet and no more than 1/16 inch in 2 feet. These are flatness limits, not permission to ignore plumb walls or drainage slopes; confirm the applicable standard and installation-system requirements for the project.
Resolve discrepancies before setting tile. A wall that bows or a corner that departs from plumb changes the cuts and can prevent the intended alignment.
Keep waterproofing and layout on separate approval tracks. The coordination needed for Schluter shower waterproofing includes the same niches, corners, and penetrations shown on the tile elevations, but the waterproofing assembly must follow its own system instructions.
For a 2026 installation, retain the current instructions for the specified system with the drawings. Tile and grout are the finish, not substitutes for the required waterproofing assembly.
Can the wall layout continue onto the shower floor?
Treat the shower floor as a separate design. A tile suitable for a shower wall is not automatically suitable for a wet, barefoot floor, and a matching appearance does not establish installation compatibility.
A floor that slopes toward a point drain has different geometry from a single-plane floor designed around an appropriate linear-drain arrangement. Large tiles do not simply bend across changes in slope; the installer must resolve the geometry through a suitable format or planned cuts.
Ask for a floor drawing that identifies the drain, slope direction, tile cuts, and transitions. Verify the specific tile's intended application and relevant slip-resistance information rather than transferring a wall approval to the floor.
Do not force wall-joint alignment onto the floor at the expense of drainage. Where alignment is practical, show it explicitly; where it is not, make the transition intentional.
How do you turn the layout into an order?
Build the quantity from the approved elevations, including niche interiors, returns, and exposed edges. Then have the installer account for the actual cutting pattern, breakage allowance, and retained replacement material rather than applying an unexplained allowance.
Tileon.com sells Italian and Spanish porcelain tile, porcelain slabs, mosaics, and other specialty formats. Its Gem Panda Tile is described as part of a large format porcelain collection; that description alone does not confirm dimensions, finish, or suitability for a particular shower application.
Before selecting it for your project, verify the current product specifications against the wall and floor requirements separately. The same check applies to every shortlisted tile, regardless of its appearance.
For your 2026 order, confirm the specified format, finish, quantity, current stock availability, and delivery arrangements before committing the installation schedule. Do not treat a sample or a layout approval as confirmation that the full project quantity is ready to ship.
Should shower tile be centered on the wall?
Center the tile or the grout joint as a comparison, then inspect the resulting cuts. The better arrangement is the one that balances visible edges while accommodating fixtures, corners, and openings.
Do not preserve symmetry on the back wall if it creates an impractical strip at the entrance. Review the enclosure as a connected set of surfaces.
Should grout lines align with the shower niche?
Align grout lines with the niche when the construction and tile module support that detail. Establish the relationship before the opening is finalized, not after waterproofing is complete.
If the niche cannot move, adjust the tile grid and compare the cuts around it. A deliberate perimeter is more important than forcing alignment that leaves fragile pieces.
FAQ
What's the first step in planning a large format shower tile layout?
Measure the shower and draw each wall elevation before choosing the starting tile. Distinguish unfinished framing dimensions from the finished tile dimensions.
Is horizontal or vertical shower tile better?
Neither orientation is automatically better; choose the arrangement that produces workable cuts and intentional joint placement. Compare both on measured elevations, including the niche and entrance.
Can I use an offset pattern with large porcelain shower tile?
Use an offset pattern only within the tile manufacturer's installation requirements. Check the permitted offset and have the installer assess tile warpage before approving the pattern.
Do large shower tiles need grout joints?
Large shower tiles require joints specified for the tile and installation system. Do not plan a butt-jointed installation or assume that rectified edges eliminate the need for joints.
Should I choose the niche position before ordering tile?
Coordinate the niche position with the tile module before finalizing the layout and installation quantity. Framing, plumbing, and waterproofing requirements determine whether the preferred position is feasible.
Can the same large tile go on shower walls and floors?
Use the same tile only when its specifications support each application and the floor layout accommodates drainage. Wall suitability alone does not establish wet-floor suitability.
What should I confirm with Tileon.com before placing a project order?
Confirm the selected porcelain tile's dimensions, finish, application specifications, quantity, current stock availability, and delivery arrangements. Match that information to the approved layout before scheduling installation.
One last thing
Print the elevations and mark every cut that will remain visible after the glass, trim, and fixtures are installed. Then ask the installer to identify the hardest piece to fabricate.
Resolve that piece before approving the starting line. It is a more useful final check than judging the back wall alone.