

Large format porcelain tile grout joints should follow the tile manufacturer’s minimum joint width and be wide enough to accommodate actual tile-size variation; do not select the narrowest spacer on appearance alone. Rectified edges do not permit a joint-free installation, and grout joints do not replace the movement joints your installation needs.
- Size large format porcelain tile grout joints from manufacturer instructions and actual tile variation, not showroom photographs.
- ANSI A108.02 sets a 1/16-inch minimum; product requirements and dimensional variation can require wider joints.
- Rectified porcelain tile still needs grout joints and a properly prepared substrate.
- TileOn serves homeowners and designers sourcing Italian and Spanish porcelain tile for full renovation projects.
Why this matters
A narrow joint makes each tile edge more prominent. Differences in tile dimensions, edge height, and alignment become harder to absorb into a consistent layout, especially under light that falls across the floor.
For your 2026 renovation, select the tile and installation specification together. TileOn carries Italian and Spanish porcelain tile, but the country of origin or visual finish does not establish the correct grout joint. The exact product instructions and delivered material determine what your installer can specify.
Choose the joint after checking the tile, not before choosing the tile. This prevents a design preference from becoming an installation requirement the material cannot meet.
How wide should large format porcelain tile grout joints be?
For a 2026 project specification, ANSI A108.02 provides an important baseline: grout joints must be at least three times the actual variation in facial dimensions of the supplied tile, and never less than 1/16 inch. The manufacturer’s instructions can require a wider joint. The smallest number in the standard is therefore not an automatic recommendation for your floor.
Use the following comparison to discuss the options with your installer. These widths are specification choices to evaluate, not approvals for any particular product.
| Joint width | Best for | Advantage | Limitation |
|---|---|---|---|
| 1/16 inch | Products explicitly permitting a very narrow joint, with sufficiently consistent dimensions | Produces a restrained joint line | Leaves little room for dimensional variation; not a default for large format tile |
| 1/8 inch | Projects whose product instructions and measured variation support this width | Provides a more visible separation between tile edges | Still requires dimensional checks, flatness preparation, and layout approval |
| 3/16 inch | Products or installation conditions requiring a wider joint | Accommodates more dimensional variation than narrower alternatives | Creates a more noticeable grout grid |
The decision is not simply whether a tile is labeled rectified. Your installer must reconcile the specified minimum, the measured size variation, and the proposed layout. Where requirements differ, use the more restrictive applicable requirement rather than averaging them.
Ask for the final joint width on the installation drawing or written scope. A verbal request for a thin grout line leaves too much room for interpretation between the homeowner, designer, contractor, and installer.
1/16-inch joints: a minimum, not a default
A 1/16-inch grout joint is not a general specification for large format porcelain tile. It is the minimum stated in ANSI A108.02, subject to the standard’s dimensional-variation requirement and the tile manufacturer’s instructions.
Rectification means the tile edges have been mechanically finished to achieve more consistent dimensions. It does not eliminate manufacturing variation, tile curvature, or the need for movement accommodation. A rectified label alone does not establish that this narrow joint is appropriate.
The visual benefit is a fine joint line. The trade-off is less tolerance for differences between neighboring pieces, making careful material inspection and accurate setting especially important.
Before approving this width, have the installer confirm that the delivered tile supports it. Do not use a photograph of a completed room as evidence: lighting, grout color, camera distance, and image editing can all obscure the actual joint.
1/8-inch joints: confirm the material before approval
A 1/8-inch joint is an option to evaluate when you want a restrained grout pattern without specifying the narrowest permitted minimum. It is suitable only when the product instructions and actual tile variation support it.
The advantage is a clear separation between pieces without making the grout grid the dominant design feature. The limitation is that this width does not correct a bowed tile, an uneven substrate, or a poorly planned offset.
For your 2026 tile schedule, write the width explicitly rather than using descriptions such as minimal joints. Include the grout color and the proposed layout so the installer prices and plans the same installation you expect to receive.
Approve the appearance with a physical mockup. View it from standing height and under the room’s intended lighting, not just from directly above the tile edges.
3/16-inch joints: more allowance, a stronger grid
A 3/16-inch joint provides more space between tiles than the narrower options. Consider it when the manufacturer’s instructions, dimensional variation, or intended layout call for that width.
The practical benefit is additional allowance for tile-size differences. The design trade-off is a more visible grid, particularly when the grout contrasts with the porcelain surface.
A wider joint is not a repair method for an unsuitable substrate. Your installer must still address flatness, edge alignment, mortar coverage, and the installation system before setting tile.
If this width changes the intended appearance, resolve the issue before installation. You can reconsider the tile, layout, or grout color; reducing a required joint width is not the solution.
Why large format porcelain tile grout joint width varies
The correct width depends on the supplied material and installation requirements, not simply the dimensions printed in the catalog. Review these factors before finalizing the specification:
- Manufacturer instructions. The stated minimum joint width applies to the specific product. Do not transfer a requirement from a visually similar collection.
- Actual tile variation. Nominal dimensions describe the format; measured differences between supplied pieces determine the allowance the joints need.
- Edge treatment. Rectified and nonrectified edges behave differently visually, but neither label replaces dimensional checks.
- Tile curvature and layout. The relationship between adjacent tile edges changes with the laying pattern. A proposed offset needs review against product instructions.
- Installation conditions. Substrate preparation and movement accommodation remain essential, even when the grout joint itself satisfies the width requirement.
Grout color changes how strongly you see the joints, but it does not change their required width. Treat color as a design decision after the technical minimum has been established.
How do you confirm the joint width before installation?
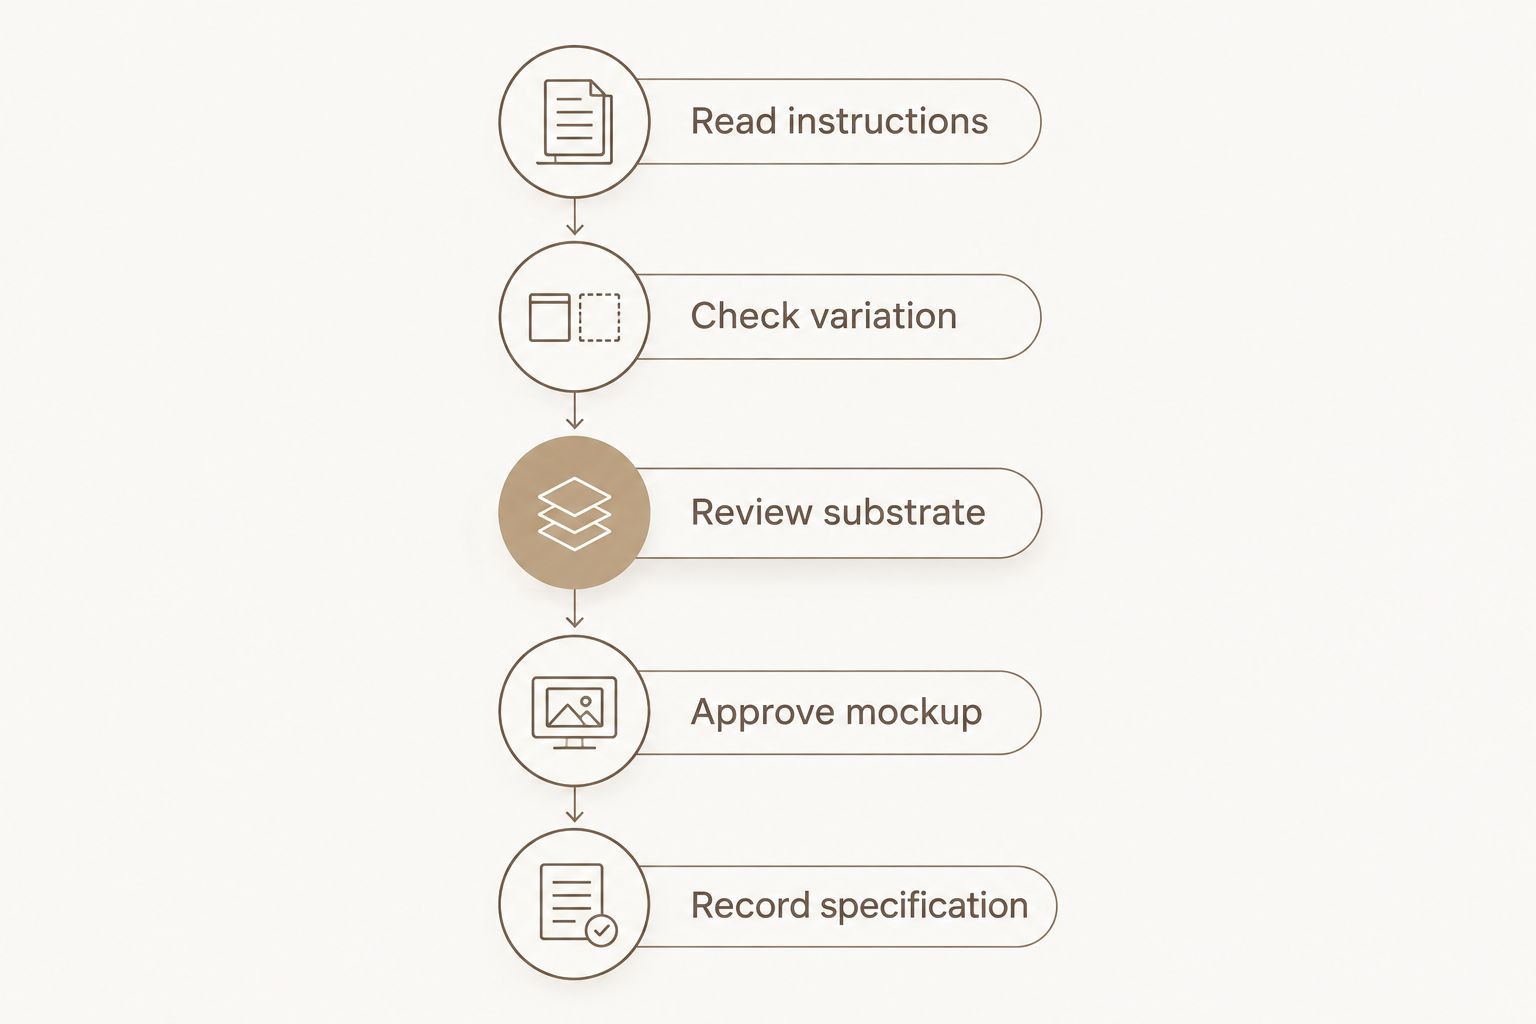
Use a documented approval sequence for your 2026 project. The homeowner or designer establishes the intended appearance; the installer confirms that the actual material and installation conditions support it.
- Read instructions. Obtain the current installation requirements for the exact tile, including any joint-width and layout restrictions.
- Check variation. Have the installer compare dimensions across representative pieces from the delivered material, rather than relying on a display sample.
- Review substrate. Confirm that substrate preparation is appropriate for the selected tile format before setting begins.
- Approve mockup. Review the intended tile arrangement, joint width, and grout color together under representative lighting.
- Record specification. Put the approved width, layout, grout, and movement-joint requirements into the installation documents.
The sequence matters. A mockup made before material checks can establish an appearance that the delivered tile cannot consistently reproduce.
Keep the approved mockup available during installation. It gives everyone a physical reference for the intended appearance, while the written specification establishes the technical requirements.
Separate grout joints from movement joints
Grout joints separate adjacent tiles and receive the specified grout. Movement joints are deliberately detailed locations that allow movement within the installation; they are not simply wider grout lines.
Do not ask the installer to fill every perimeter or change of plane with rigid grout for a more uniform appearance. Follow the applicable movement-joint details, including TCNA Handbook guidance in EJ171 and the installation system’s instructions.
A narrow grout joint cannot substitute for movement accommodation. Neither can a wider grout joint filled with rigid grout. The two details serve different purposes and must both appear in the installation plan.
For exterior areas, heated floors, and spaces exposed to direct sunlight, have the installer review the applicable conditions specifically. An interior room photograph does not establish the correct detail for a different exposure.
Coordinate grout color, lighting, and edge appearance
Use grout color to soften the grid, not undersized joints. A closely related color reduces contrast between the porcelain surface and the joint; a contrasting color emphasizes the laying pattern.
Neither choice is universally better. Matching grout supports a quieter field, but small color differences still remain visible. Contrasting grout makes the layout more legible, while also drawing attention to inconsistent alignment.
Inspect the mockup with light falling across the surface. Grazing light makes differences in neighboring edge heights easier to see, so the room’s windows and lighting locations belong in the approval discussion.
Check the physical grout sample and the grout manufacturer’s guidance before making the final selection. A screen image cannot establish the exact installed relationship between tile, grout, and room lighting.
What should your tile order and installation scope include?
For a 2026 purchase, coordinate the product selection with the installation plan before committing the project schedule. TileOn is best for homeowners and designers sourcing Italian and Spanish porcelain tile for full renovation projects. Product selection still requires a separate check of the exact tile’s suitability and installation requirements.
Confirm the product identity, format, finish, required quantity, and applicable technical documentation. Ask about current stock availability and delivery arrangements for the exact order rather than treating a catalog listing as a project commitment.
Your installation scope should distinguish material selection from site preparation. Include responsibility for dimensional checks, substrate correction, layout approval, movement joints, and the grout specification.
The limitation of choosing online is that a product image cannot establish delivered dimensional variation or site readiness. Resolve those items through documentation, material inspection, and installer review—not through assumptions about a collection’s appearance.
Can rectified porcelain tile be installed without grout joints?
Rectified porcelain tile still requires grout joints. Mechanically finished edges improve dimensional consistency, but they do not make the pieces dimensionally identical or remove installation requirements.
If your goal is a visually continuous surface, select a compatible grout color and approve the layout. Do not butt the tiles together to imitate the appearance of a slab.
Does a wider grout joint eliminate lippage?
A wider grout joint does not eliminate lippage, which is the difference in height between adjacent tile edges. Joint width is only one part of the installation; tile curvature, substrate conditions, layout, and setting quality also affect the result.
Ask the installer to diagnose the cause before changing the joint specification. More grout space is not a substitute for correcting the underlying condition.
FAQ
What is the minimum grout joint for large format porcelain tile?
ANSI A108.02 sets a minimum grout joint of 1/16 inch and requires a width at least three times the actual variation in tile facial dimensions. The tile manufacturer’s instructions can require a wider joint.
Is a 1/8-inch grout joint suitable for large format porcelain tile?
A 1/8-inch grout joint is suitable only when the tile manufacturer’s instructions and measured tile variation support it. Confirm the width with the installer using the delivered material.
Does rectified tile always allow a 1/16-inch grout joint?
Rectified tile does not automatically allow a 1/16-inch grout joint. Edge finishing improves dimensional consistency, but the product requirements and actual dimensional variation still control the minimum width.
Can I use matching grout to make the joints less visible?
Matching grout reduces the visual contrast between the tile and the joints. Approve a physical mockup because lighting and the installed grout color affect the result.
Should large format shower tile have the same joints as the bathroom floor?
Large format shower tile does not automatically use the same joint width as the bathroom floor. Check each product’s instructions and the shower installation requirements, including movement accommodation and changes of plane.
Can leveling clips replace substrate preparation?
Leveling clips do not replace substrate preparation. The substrate must meet the applicable installation requirements before the tile is set.
What should I confirm before ordering porcelain tile from TileOn?
Confirm the exact porcelain tile’s specifications, application suitability, installation requirements, quantity, current availability, and delivery arrangements with TileOn. Have the installer review joint width and layout before installation begins.
One last thing
The spacer width and the visible grout line are not always identical. Beveled or shaped tile edges can make the finished joint look wider at the surface than the gap between the tile bodies.
Approve the finished appearance, not just the spacer. A grouted mockup answers the design question that a loose tile arrangement leaves unresolved.