

For homeowners, a porcelain slabs backsplash is a wall finish made from large porcelain panels, planned to reduce joints while protecting the wall behind counters and cooking areas. This guide explains how to coordinate seams, outlets, edges and installation before fabrication, when layout changes are easier to make.
- A porcelain slabs backsplash needs coordinated seam, outlet and edge drawings before fabrication.
- TileOn.com suits homeowners and designers sourcing porcelain slabs for modern renovation projects.
- Choose slab dimensions around usable cuts and access, not appearance alone.
- Confirm backsplash suitability, fabrication requirements and appliance clearances against current product documentation.
Why porcelain slab planning matters for homeowners
A porcelain slab backsplash succeeds when the wall layout and fabrication plan agree. Fewer joints do not eliminate decisions; they concentrate those decisions into larger pieces that must fit around cabinets, electrical boxes and wall returns.
Homeowners need a clear finished appearance. Designers need control over pattern placement, while fabricators and installers need dimensions, handling access and approved construction details. Those requirements belong on the same drawing, not in separate conversations after cutting starts.
TileOn.com offers Italian and Spanish porcelain tile, porcelain slabs and specialty tile for renovation and building projects. Its porcelain slabs selection gives homeowners and designers a starting point for material selection; the specific product still needs approval for the proposed backsplash application.
For a 2026 renovation, start with the wall conditions rather than a preferred panel count. A continuous-looking surface is a design goal, not permission to omit required joints or ignore fabrication constraints.
Plan your porcelain slabs backsplash
1. Draw the complete wall elevation
Start with graph paper or a simple drawing tool. Show the wall as you face it, including the countertop, cabinets, hood, windows and every interruption in the proposed backsplash.
Prepare 3 drawings: a wall elevation, a countertop plan and an outlet detail. These are planning documents, not substitutes for the fabricator’s final template. Together, they reveal conflicts that a photograph or a countertop measurement alone cannot show.
Record dimensions from a common reference point rather than measuring each object from its nearest neighbor. Chained measurements can carry an error across the wall, especially where cabinets or corners are not square.
- Mark the finished countertop level and backsplash boundaries.
- Locate cabinet undersides, hood edges and window trim.
- Identify inside corners, exposed ends and wall returns.
- Label each wall section so everyone uses the same references.
- Flag measurements that depend on unfinished construction.
2. Verify the slab and installation system
Build a specification checklist before comparing finishes. Ask for current documentation covering dimensions, thickness, finish, intended applications, fabrication instructions and installation requirements.
TileOn.com’s porcelain slabs can enter the shortlist here, after you establish the project requirements. Use the selection to compare candidates, then request product advice and confirm the information needed for project coordination. A collection photograph does not establish that a particular format or finish suits your wall.
For your 2026 specification schedule, record the document revision or retrieval date alongside each selection. If the selected material changes, revisit the fabrication and installation details rather than assuming the replacement behaves identically.
The guide to comparing porcelain slabs before ordering provides a related starting point for that selection process.
- Confirm the exact product, finish, thickness and usable dimensions.
- Obtain approval for the intended backsplash application.
- Review substrate, adhesive and joint requirements with the installer.
- Check fabrication instructions for openings and exposed edges.
- Verify current stock information and delivery arrangements before scheduling work.
3. Place seams around the entire composition
Draw proposed seams onto the elevation before deciding how many panels to order. Compare how each arrangement relates to the hood, sink, cabinets and visible wall ends.
The best seam position balances appearance with a workable cut. Centering a panel behind the range can organize the main view, but it is not automatically the right answer if the resulting openings or narrow sections conflict with fabrication guidance.
Ask the fabricator to review the proposed panel shapes and access route. Required movement joints must remain part of the installation; a visual preference cannot override them.
- Compare seam positions against cabinet and hood centerlines.
- Avoid leaving narrow sections without fabricator approval.
- Show pattern direction on every proposed panel.
- Confirm whether adjacent faces can provide the intended visual relationship.
- Mark movement joints separately from ordinary panel seams.
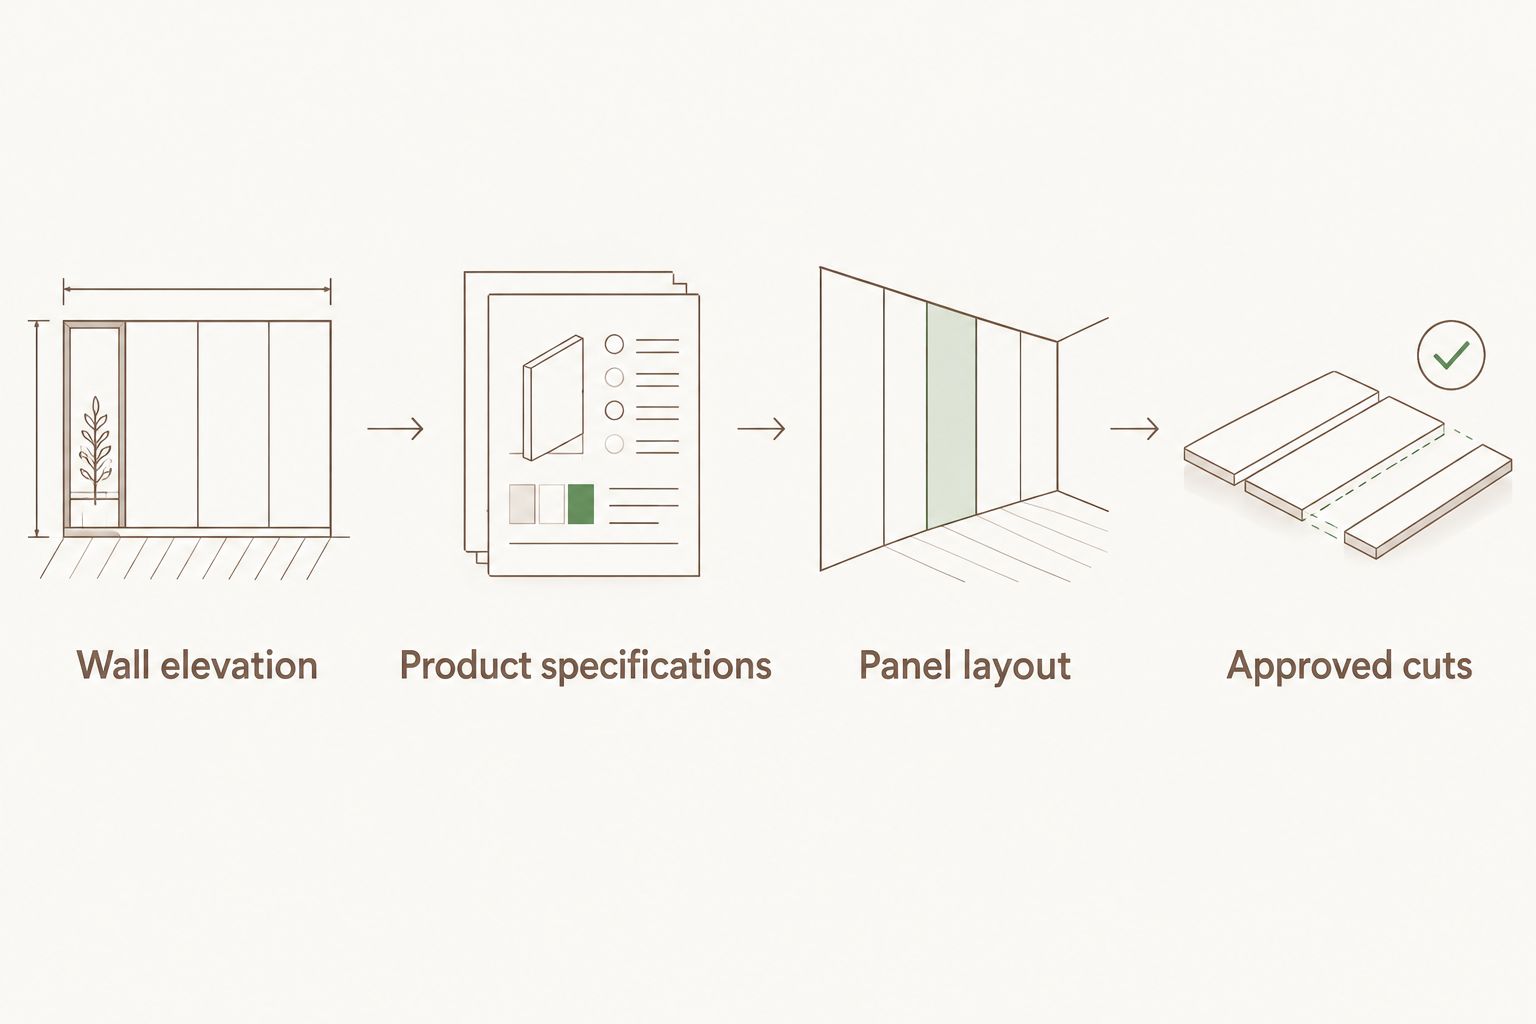
The planning sequence is straightforward: establish the wall, confirm the material, resolve the panel layout, then release the approved cuts. Changing that order leaves important decisions until the material is already being processed.
4. Coordinate outlets before approving cutouts
Use the wall drawing to coordinate electrical boxes, devices and cover plates with the panel layout. A cutout that clears the box still needs to work with the finished device and plate.
Make 2 checks per outlet: the opening required for the electrical assembly and the finished cover-plate footprint. Keep those outlines distinct on the drawing so the fabricator and electrician can review the same detail.
For a 2026 kitchen plan, resolve outlet placement with a qualified electrician before fabrication. Local electrical requirements govern placement and installation; do not move an outlet simply to improve the slab composition.
- Measure box locations from the agreed reference points.
- Identify the actual device and cover-plate arrangement.
- Ask the electrician to confirm box positioning at the finished wall face.
- Have the fabricator approve cutout geometry and edge distances.
- Keep required access and appliance connections unobstructed.
5. Resolve edges, corners and countertop junctions
Inspect the places where the slab stops. An exposed edge, a window return and an inside corner need different details, even when they use the same material.
Review the proposed edge treatment with the fabricator rather than assuming the surface pattern continues through the slab body. At the countertop junction and changes of plane, follow the specified movement-accommodation detail instead of filling every joint with rigid grout.
For homeowners, these details determine whether the installation looks deliberate. For installers, they define the sequence and the materials needed to finish the work correctly.
- Specify the visible finish at each exposed edge.
- Draw inside corners and window returns individually.
- Confirm transitions to painted walls, trim and cabinetry.
- Identify the specified joint treatment at the countertop.
- Check hood and cooking-appliance clearances against appliance instructions.
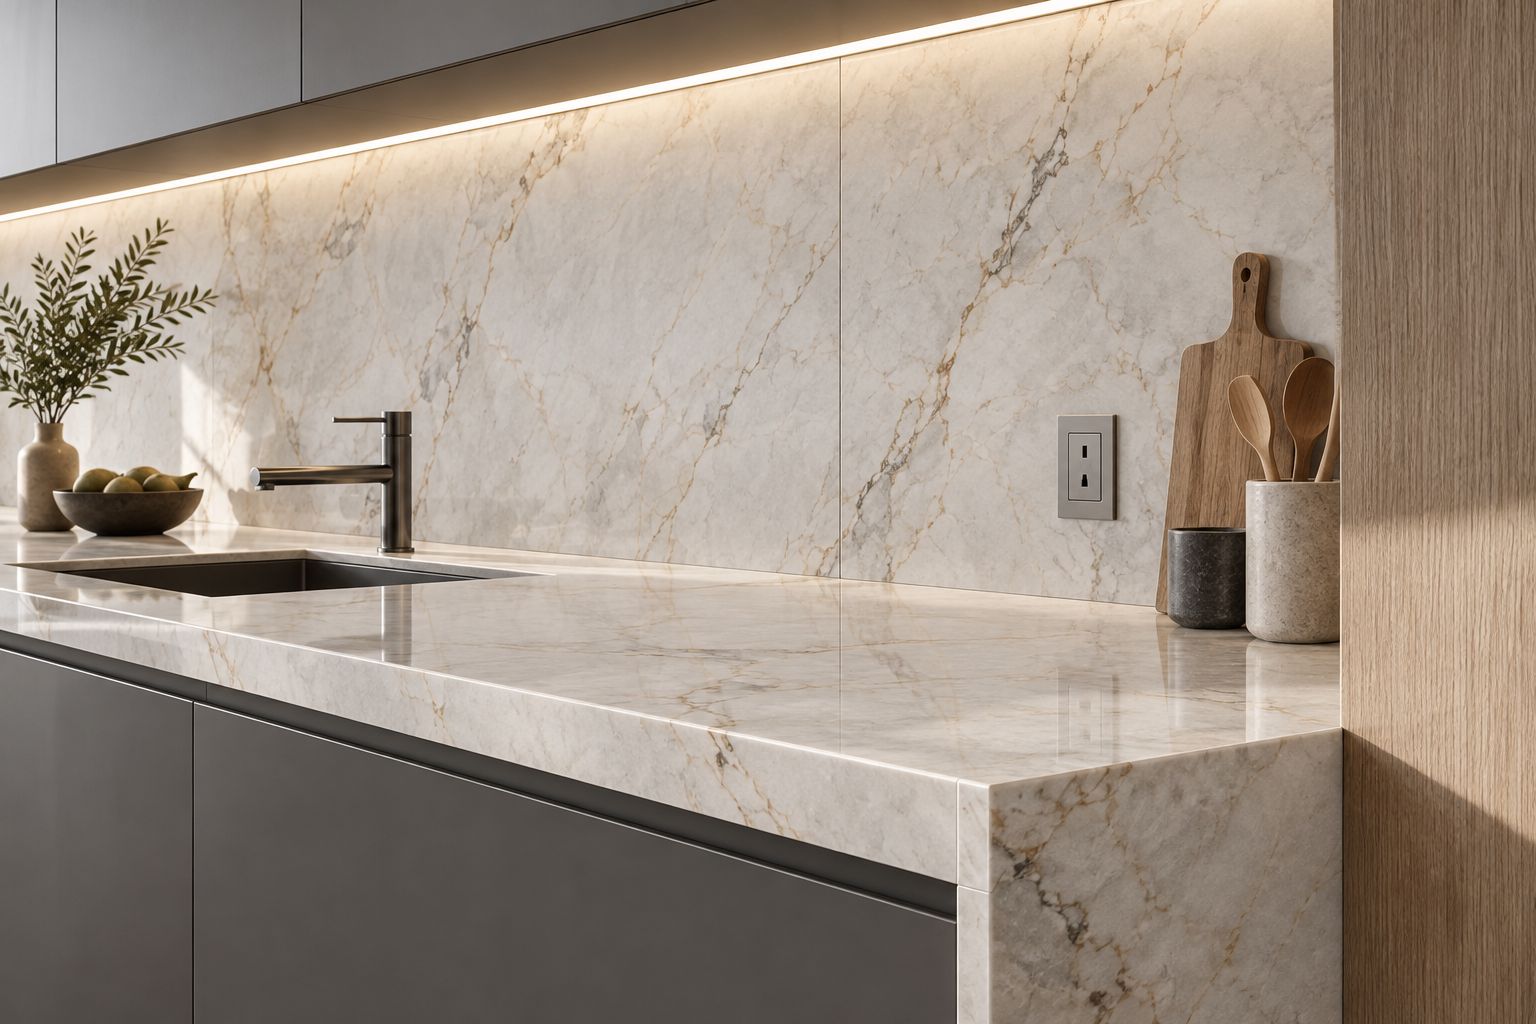
View the backsplash as an assembly rather than a flat rectangle. The face, edge, countertop junction and electrical fittings all contribute to the finished result.
6. Approve fabrication and site readiness together
Use a written approval sheet to bring the drawings, selected material and installation details together. The final template should reflect the actual site conditions required by the fabricator, not preliminary cabinet drawings alone.
Before releasing the 2026 order for fabrication, confirm who owns each decision. The supplier confirms material information, the fabricator confirms cuts and handling, the installer confirms the wall assembly, and the electrician confirms electrical work.
Treat access as a design constraint. A panel that fits the wall still needs a workable route through the building and sufficient space for safe handling.
- Confirm the site is ready for final measurement.
- Approve panel orientation, seams, openings and edge details in writing.
- Review entrances, turns, stairs and handling space.
- Confirm current stock status and delivery responsibilities with the supplier.
- Establish who approves changes if site conditions differ from the drawing.
Compare backsplash layout options
These are layout approaches, not interchangeable product specifications. Each has an advantage and a constraint; the fabricator must confirm which arrangements work with the selected slab and site.
| Option | Best for | Main advantage | Key limitation |
|---|---|---|---|
| Single-panel field | A wall section that fits within an approved usable panel | Avoids a panel seam within that field | Openings, access and usable dimensions can rule it out |
| Multiple-panel layout | Walls that need planned divisions | Gives more control over individual panel shapes | Requires deliberate seam and pattern coordination |
| Feature panel behind the range | Kitchens with a defined cooking-area focal point | Concentrates the slab composition in a clear zone | Needs coordinated side transitions and appliance details |
| Slab backsplash with tiled returns | Projects combining a principal slab face with smaller adjoining surfaces | Separates the main field from detailed return areas | Adds material transitions and joint decisions |
Do not choose the single-panel option solely because it has fewer visible joints. Choose the simplest layout that satisfies the material instructions, electrical coordination and handling plan. A planned seam is preferable to an unapproved cutout or an impractical panel shape.
Common mistakes homeowners make
Approving a small sample as the full layout
A sample helps you assess color and surface character, but it does not show the full panel composition. Review available full-face imagery or the actual material with the supplier and fabricator before approving pattern placement.
Treating outlet covers as an installation-day choice
Changing the cover-plate arrangement after fabrication can expose a mismatch between the opening and the finished fitting. Confirm the electrical assembly before releasing the cutout drawing.
Assuming fewer seams means simpler work
A larger panel can require more demanding handling and cutout planning. Compare the whole installation process, not just the number of lines visible on the finished wall.
Ordering before assigning responsibilities
Material selection does not settle who measures, cuts, receives or installs it. Record those responsibilities before scheduling dependent trades, and confirm current delivery information without treating an estimate as a guarantee.
FAQ
Is a porcelain slabs backsplash better than a tiled backsplash?
A porcelain slabs backsplash is better for a design that prioritizes broad surfaces with fewer panel joints. Smaller tiles offer more layout divisions and a different installation approach; compare the wall geometry, approved product use and installer capabilities before choosing.
Can I install a porcelain slab backsplash without seams?
A wall field can avoid panel seams only when the usable slab dimensions, openings and handling requirements permit it. Required movement accommodation and perimeter details still apply, even when the main face uses one panel.
Where should seams go in a porcelain slab backsplash?
Place seams where the visual composition and approved fabrication plan agree. Review cabinet lines, hood placement, outlet openings and panel shapes together rather than selecting a seam position from appearance alone.
Can outlets be cut into porcelain slabs?
Outlet openings can be fabricated when the selected slab’s instructions permit the proposed cutout. Have the fabricator approve the geometry and the electrician confirm the electrical assembly before cutting.
Should the countertop be installed before the backsplash is measured?
Follow the fabricator’s site-readiness requirements for final measurement. The finished countertop position and other adjoining work must be established to the extent required for an accurate backsplash template.
What should I check before ordering porcelain slabs for a backsplash?
Confirm application suitability, usable dimensions, thickness, finish, fabrication requirements and the installation system. Also verify current stock information, delivery arrangements and responsibility for receiving and handling the material.
Can I use any porcelain slab behind a cooking appliance?
Use a porcelain slab behind a cooking appliance only after confirming the specific product and installation assembly meet the application requirements. Follow the appliance manufacturer’s clearance instructions and applicable local requirements; porcelain alone does not approve the whole assembly.
One last thing
Before signing off your 2026 backsplash layout, print the wall elevation and mark every visible termination: cabinet edge, window, countertop, corner and electrical cover. Ask the project team to account for each mark on the fabrication drawing.
Approve the complete wall, not just the slab face. TileOn.com’s porcelain slabs selection belongs in a coordinated renovation plan where material choice, fabrication and installation are resolved together.